One of my first contacts with ‘hacking’ was when I got an action replay
(cheating device) for my ds a long time ago. I remember spending countless hours looking for these magic codes on the
internet, and entering them on the small screen by hand. For hours I would compare
multiple cheat codes together, I would play around with the values, I would look for
similarities and differences between them trying to understand how they
worked. This was one of the first steps that introduced me to the world
of reverse engineering. During the follwing years I continued honing my skills
in reverse engineering by doing side projects and CTF competitions. But even
though I grasped more concepts I still had this voice at the back of my head
telling me: “I bet you can create your own cheats”.
But it changed recently after reading this
article from cturt where he goes through
the process of fixing a GBA game. I decided that it was time to try my
hand at hacking some old school games and see how far I could go. For this
experiment I will be using the game “The Legend of Zelda: A Link to the past” on
GBA (md5: 3287ca66e5cc285a9fe3a922051e84c6).
But before we start let’s have an overview of the system we are targeting.
The GBA is an ARM cpu that uses extensively the THUMB mode, a reduced subset
of ARM. If you are already familiar with assembly the code will not be hard to understand
as the instructions are straightforward in THUMB. But If you are not familiar with arm I encourage
you to read the guide made by Azeria here.
Goal
This project will not be a tutorial on “how to create X cheat” but will be more
of a exploration log. The goal is more to enjoy the journey experimenting with
various techniques and understanding the code than making cheats. In that regard
they are more means to an end. With that said, let’s get reversing !
Look ma’ ! I’m invincible !
Being invincible is always the first cheat that comes to mind when talking
about cheat codes. On old games it is also one of the easiest to make as
the health is almost always stored at a fixed address in RAM.
The most common way of finding this value is to do a memory search. By looking
at changing values when our character is hurt/heals, we can quickly narrow
down the search to a handful of addresses. After some debugging it is easy to find
our health.
This method is the classic way of finding interesting values. It is easy to do, and
most of the time gives good results. But here we are not interested in easy
techniques and that is why we are going to take a completly different path ;);
Doing static analysis or debugging directly on the rom is too complex as
there is too much code and we don’t know what is being executed. We have to find
a technique to narrow down our search to code that is useful while skipping everything else.
A simple way of doing this is through code coverage analysis
Code coverage ?
Code coverage is a metric giving out how much code is used by a program during
its execution. This coverage is computed through execution traces that are
gathered either by binary instrumentation (drcov/valgrind) or by hardware tracers
(such as Intel pt). Most of the time developers use this metric to see how much of
their code is tested through their unit tests, but it can also be used for other
purposes.
These tracers collect the addresses of basic blocks. In machine code a basic block (or block for short)
is a list of instructions that ends with a branching instruction. This is the smallest
code structure over the single instruction. By using these basic block addresses and
debug informations, the code coverage tools can tell which lines of code were executed.
Unfortunately these tools will not work in our situation as our device is exotic, which
means that we have to build our own tools. We need to create two different components.
The first one is the tracer and the second one the viewer.
For the tracer I chose to modify the very good mGBA emulator. I added logging
code on ARM and THUMB branching instructions as well as two new debugger commands to record traces:
coverage-start: To start recordingcoverage-stop <output.cov>: To stop recording and save the trace
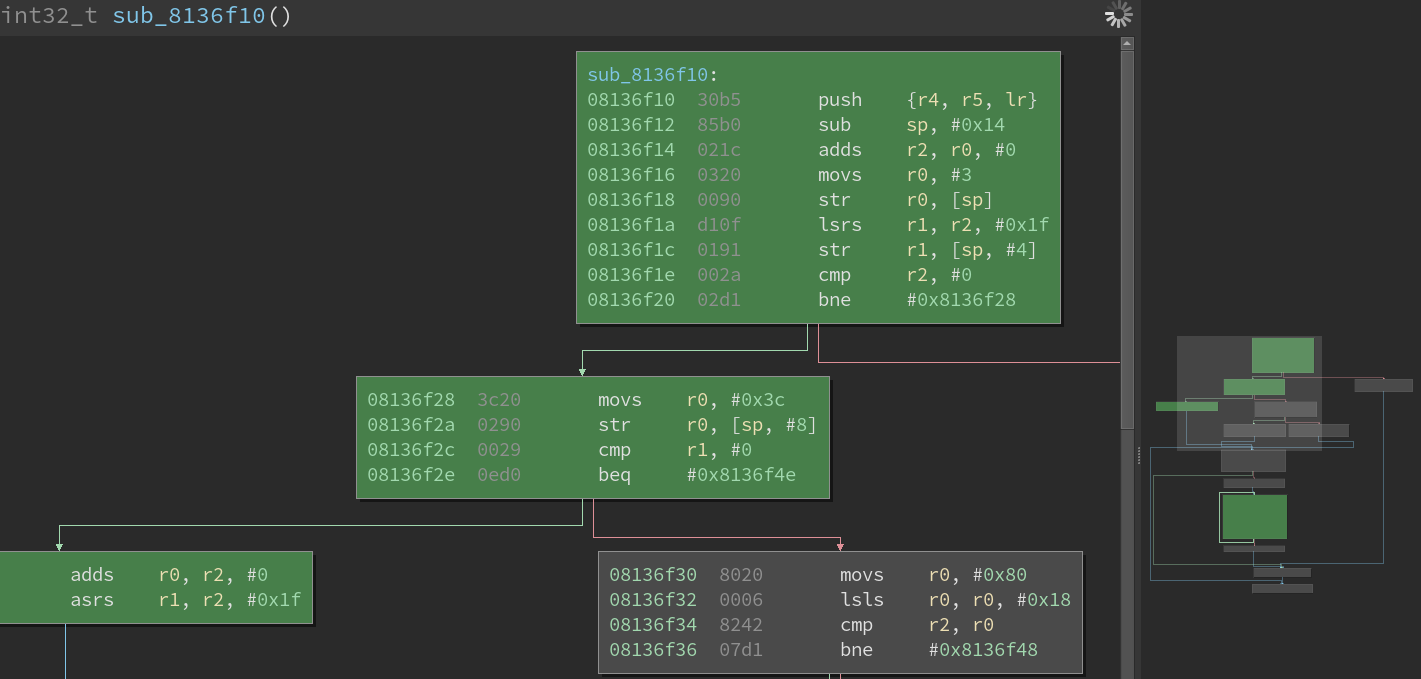
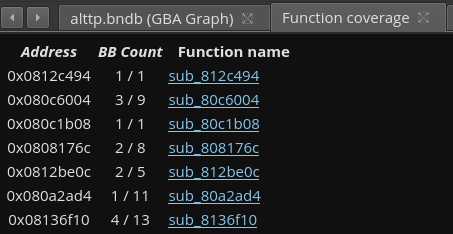
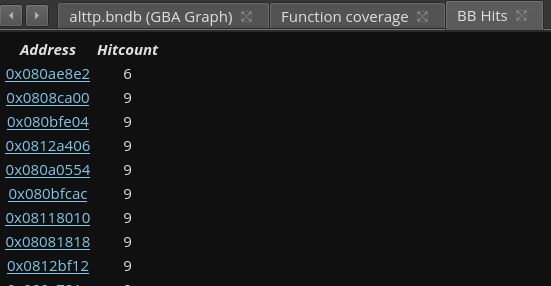
For the viewer I wanted something similar to lighthouse. I implemented it as a quick
and dirty binary ninja plugin, but it should easily be portable to other tools. Its most basic features are
basic block highlighting, function report and basic block report. I chose to add the basic block report as
this granularity will prove to be useful in our situation. You can see the result below:
The graph view:
Function report:
BB Report:
The attack plan
Having all these tools is great but what do we do with them ? If we capture
a trace and feed it directly to the tool we will be greeted by a few dozen
functions inside our report, and maybe a few hundred blocks. So before starting
manual analysis we will need to cut down as much as possible the amount of
blocks in traces as we don’t care about code that is always running, such
as timers, NPC movements or rendering routines.
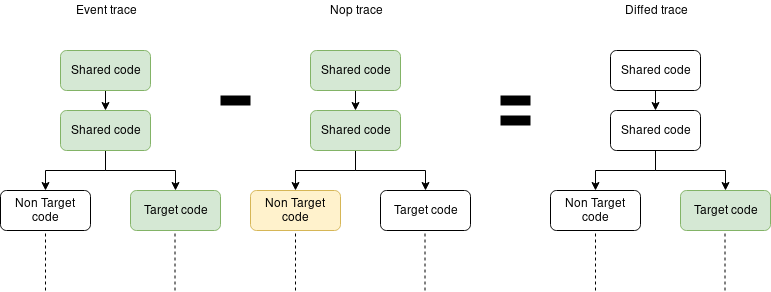
A simple way to get rid of this useless code is to take two traces. We take a
first one doing everything but the event we are targeting, and then
we take a second one triggering our target event. In the end we substract the
two traces together and we get only the basic blocks related to our event.
Another
benefit we get from this approach is that we can target abstract events. By relying solely
on RAM watching we can target values such as the health or money. But when we get to more abstract
concepts such as user <-> world interaction, it gets harder to find anything of value here.
Finding Link’s health
Before recording our event we have to record some noise. To do this we record
a normal gameplay session triggering every possible event except the one we
target. The goal is to record as much unrelated code as possible to simplify
our next trace. For the second trace we have to make our target block recognisable.
The easiest way to trigger code manipulating Link’s health is to get attacked by
a NPC. At one point Link’s health must decrease via a substraction, so our goal is
to find a block with a subs instruction. The binja plugin can show us the amount of hits
on a specific basic block. To cut through the noise and detect our code more easily we
can trigger our event a specific number of times. For this example I got Link hit
4 times, which resulted in a trace with 54 different blocks with 4 hits.
After a few minutes searching for our subs instruction we find the block at
address 0x809dae2.
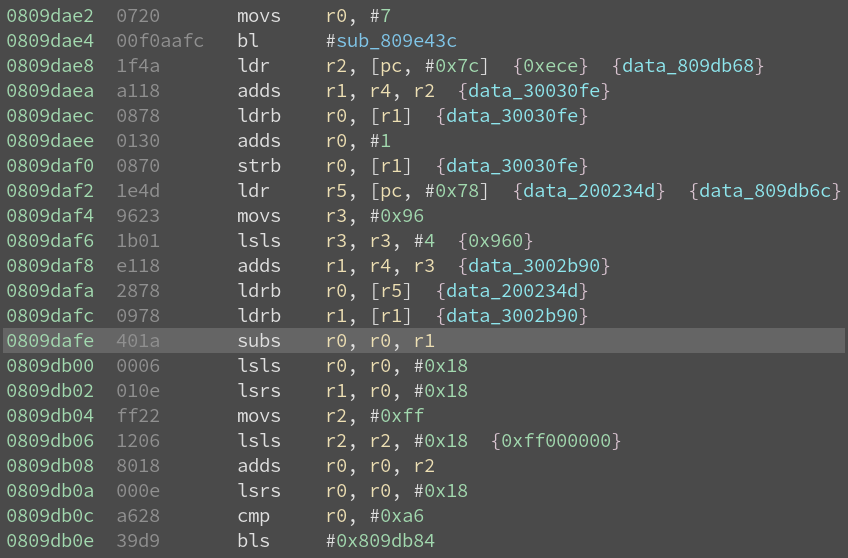
To verify that this is the right block we can start the debugger and take a
few hits:
> break/t 0x0809dafe
> c
Hit breakpoint at 0x0809DAFE
 r0: 00000018   r1: 00000004   r2: 00000ECE   r3: 00000960
 r4: 03002230   r5: 0200234D   r6: 030039DA   r7: 03002230
 r8: 03007EC6   r9: 04000000  r10: 04000200  r11: 00000000
r12: 00000005  r13: 03007E70  r14: 0812C8A1  r15: 0809DB00
cpsr: 0000003F [------T]
0809DAFE:  BE00     	bkpt
> c
Hit breakpoint at 0x0809DAFE
 r0: 00000014   r1: 00000004   r2: 00000ECE   r3: 00000960
 r4: 03002230   r5: 0200234D   r6: 030039DA   r7: 03002230
 r8: 03007EC6   r9: 04000000  r10: 04000200  r11: 00000000
r12: 00000005  r13: 03007E70  r14: 0812C8A1  r15: 0809DB00
cpsr: 0000003F [------T]
0809DAFE:  BE00     	bkpt
>
The game save I am using for testing is during the tutorial. In this first section
of the game Link has 3 hearts and the NPCs deal half a heart of damage. If we consider
the register r0 to contain the health and r1 to contain the damage then everything
seems to work. 0x18 divided by 3 equals 8, which is exactly twice as big as r1. We appear
to have found the correct block ! The value inside r0 was loaded from address 0x200234d,
a global variable. We can rename it as it can prove to be useful in the future. If we
were to make a AR/Gameshark code we could stop here and call it a day. But why not patching
the game code instead ?
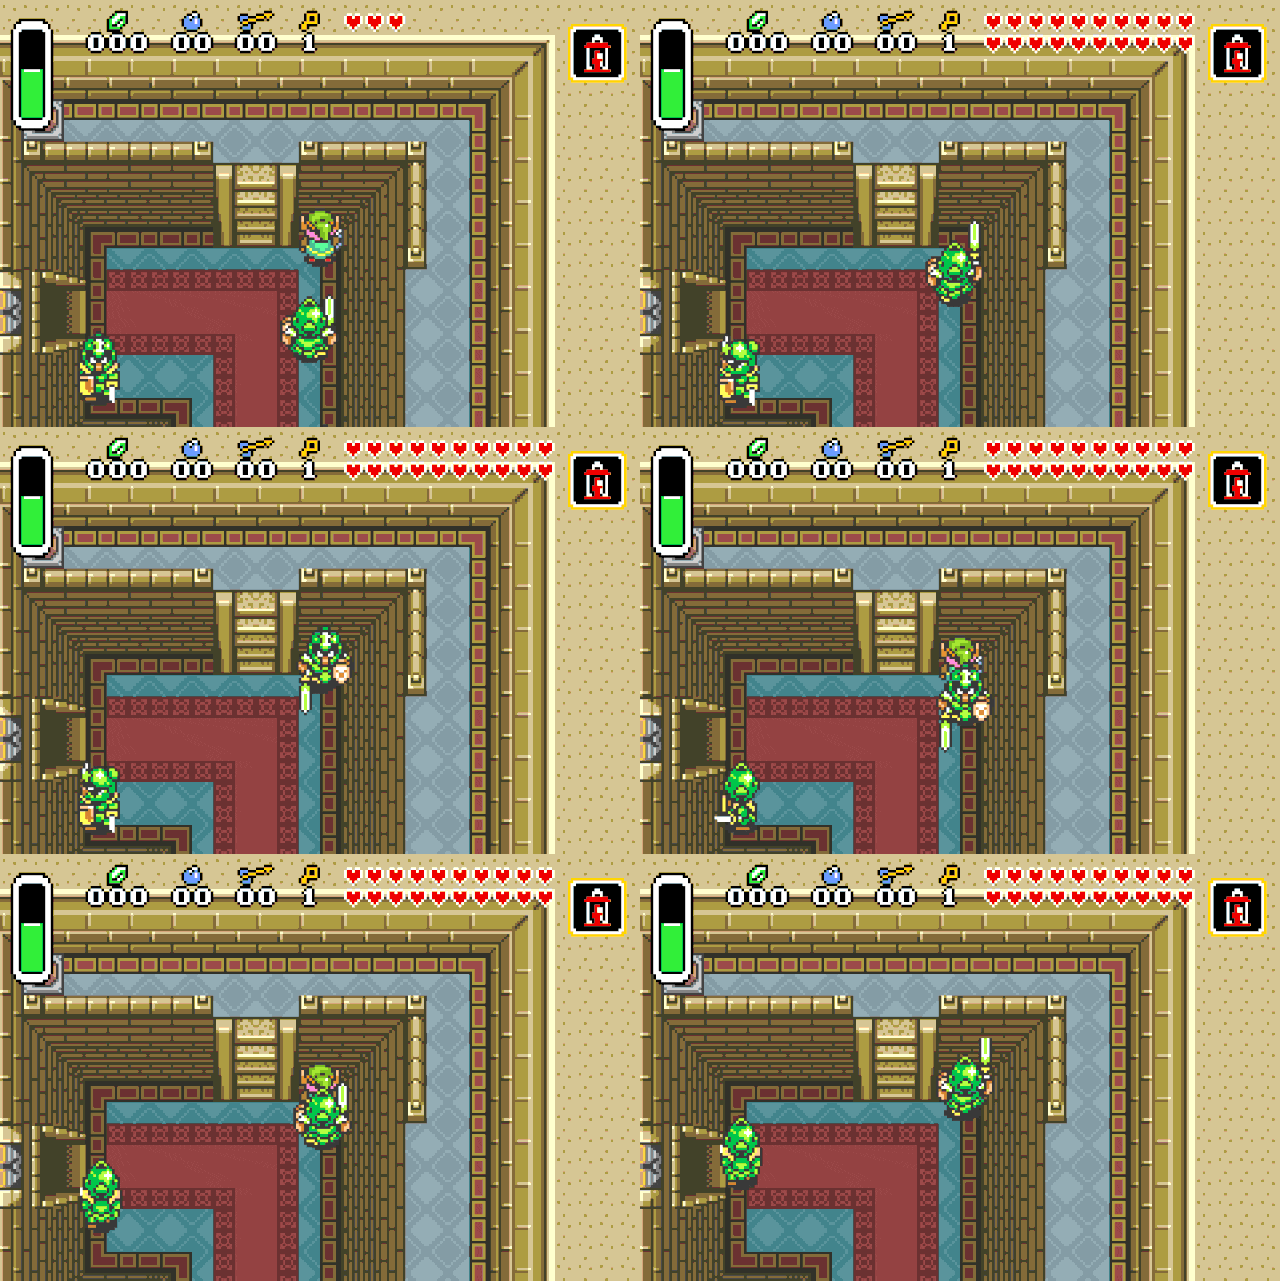
From our previous findings we know that a heart is 8 health units. As there is a maximum
of 20 hearts in Zelda we can compute that the maximum is 0xa0 health units. For the patch
we simply replace the subs r0, r0, r1 instruction by a movs r0, #0xa0 (a nop would
also have been possible). We can do the patch using radare2 with following command:
$ r2 -w -b 16 -qc "wx a020 @ 0x0809dafe" <your rom>
Instakill
Right now Link is invincible, but to save the kingdom of Hyrule he will need
more firepower. Right know he can kill its opponents in two hits. Why not granting
him the ability to instantly kill them ?
We are using the same process as previously and start by recording a nop trace.
After recording Link hitting NPCs 6 times we open the trace. We are greeted with
126 entries with 6 hits, which is a lot but still doable by hand. As for the last trace we
are looking for a subs instruction. In a few minutes we stumble upon an interesting
block at address 0x80c22a4.
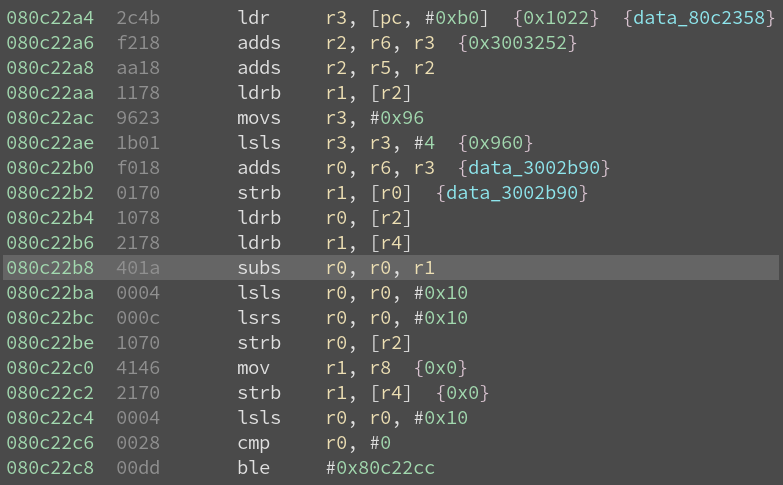
Let’s put a breakpoint on 0x080c22b8 and give a few hits:
> b/t 0x080c22b8
> c
Hit breakpoint at 0x080C22B8
 r0: 00000004   r1: 00000002   r2: 03003252   r3: 00000960
 r4: 030030E5   r5: 00000000   r6: 03002230   r7: 030031D2
 r8: 00000000   r9: 00000419  r10: 00000419  r11: 00000000
r12: 00000000  r13: 03007E50  r14: 080C1EC5  r15: 080C22BA
cpsr: 0000003F [------T]
080C22B8:  BE00     	bkpt
> c
Hit breakpoint at 0x080C22B8
 r0: 00000002   r1: 00000002   r2: 03003252   r3: 00000960
 r4: 030030E5   r5: 00000000   r6: 03002230   r7: 030031D2
 r8: 00000000   r9: 0000041E  r10: 0000041E  r11: 00000000
r12: 00000000  r13: 03007E50  r14: 080C1EC5  r15: 080C22BA
cpsr: 0000003F [------T]
080C22B8:  BE00     	bkpt
>
r0 is two time bigger than r1, so this function seems to be the right one (in two hits r0 would
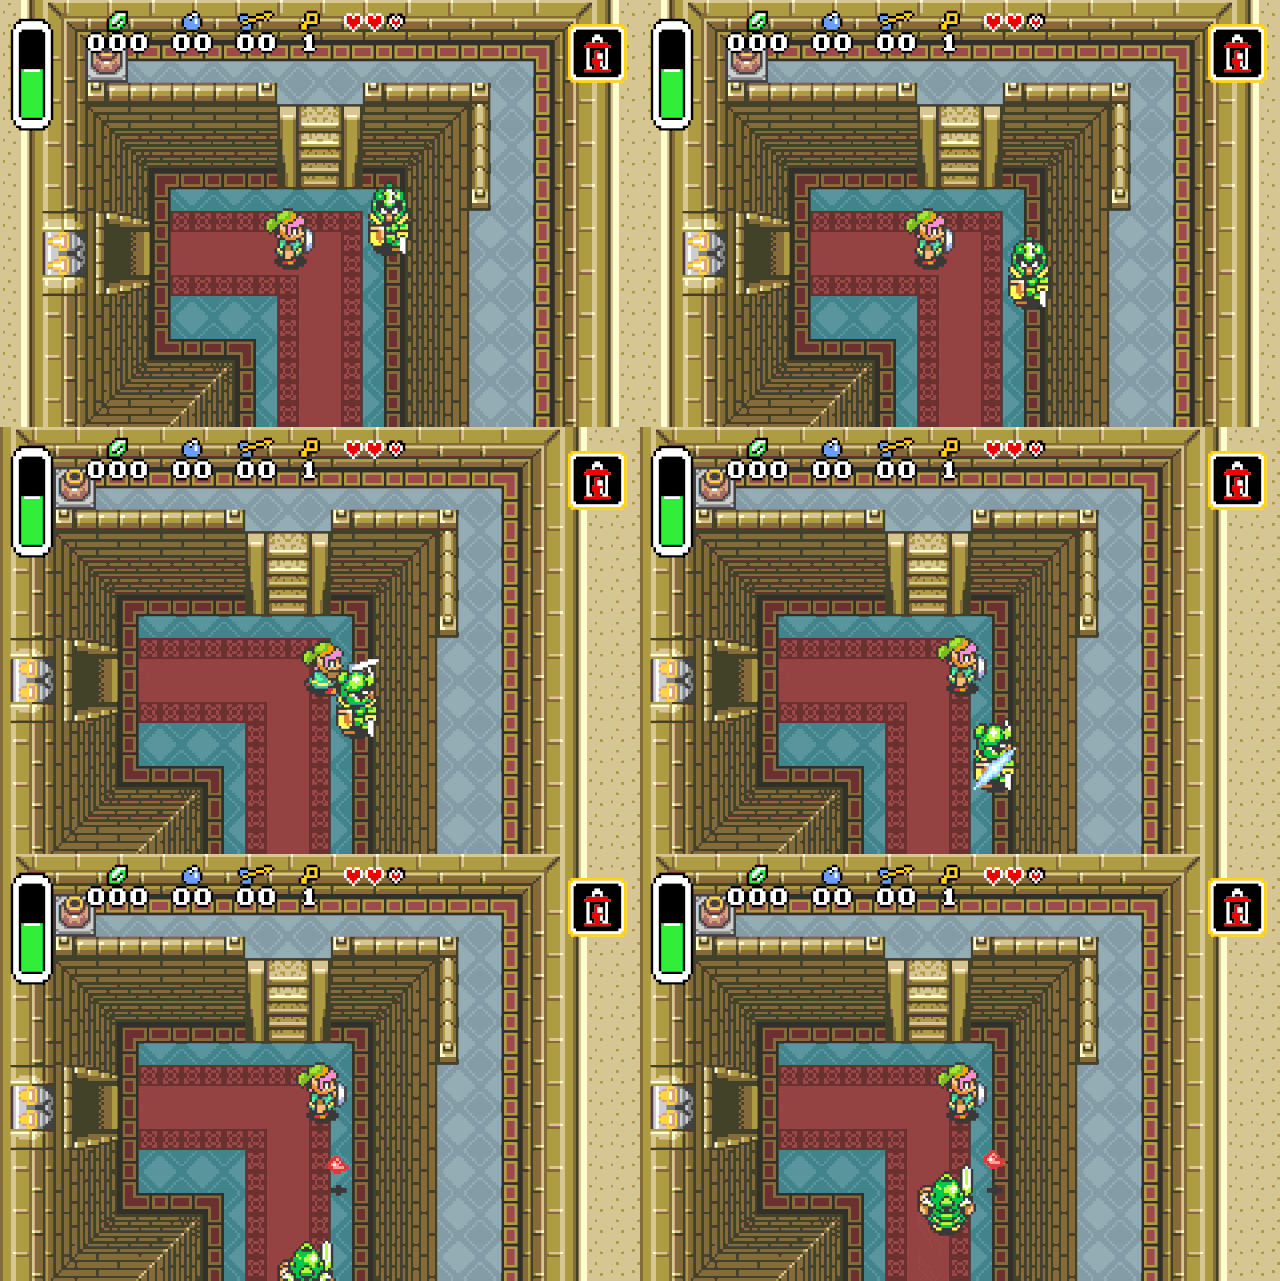
reach 0). The only way to be the sure is to patch the code. We can either set r0 to 0 or set r1
to a huge value. I chose to do the former here. We will replace ldrb r1, [r4] by mov r1, #0xff.
The radare2 command for patching is this one:
$ r2 -w -b 16 -qc "wx ff21 @ 0x080c22b6" <your rom>
Unlimited power !
Link is now invincible and incredibly strong. But he is still lacking in the magic
department, so let’s give him a little push.
In Link to the past the magic gauge is important as all special and powerful objects
use it. It is a scarce resource that must be used wisely. Naturally we don’t
want to be limited in our actions so we will fix that. We use the same technique as
before. After recording the nop trace we use our Lantern 7 times (as it uses magic)
and load the trace in the tool. We have 93 corresponding entries, and after looking around
we find the following couple of blocks:
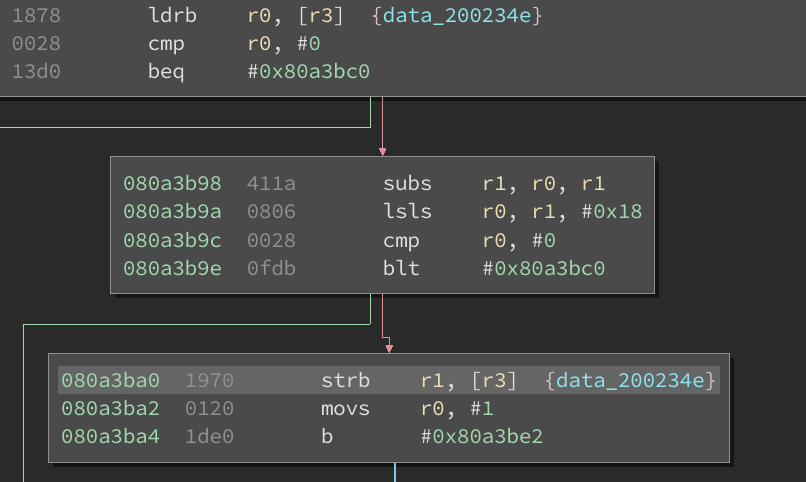
We have our subs instruction in the middle block. We can suppose that r0 is our current
amount of magic and that r1 is the cost. We can verify using the debugger.
> b/t 0x80a3b98
> c
Hit breakpoint at 0x080A3B98
 r0: 00000048   r1: 00000004   r2: 03002230   r3: 0200234E
 r4: 00000008   r5: 00000000   r6: 03003948   r7: 03002BE2
 r8: 03007EC6   r9: 04000000  r10: 04000200  r11: 00000000
r12: 0300276B  r13: 03007E48  r14: 080A2B29  r15: 080A3B9A
cpsr: 2000003F [--C---T]
080A3B98:  BE00     	bkpt
> c
Hit breakpoint at 0x080A3B98
 r0: 00000044   r1: 00000004   r2: 03002230   r3: 0200234E
 r4: 00000008   r5: 00000000   r6: 03003948   r7: 03002BE2
 r8: 03007EC6   r9: 04000000  r10: 04000200  r11: 00000000
r12: 0300276B  r13: 03007E48  r14: 080A2B29  r15: 080A3B9A
cpsr: 2000003F [--C---T]
080A3B98:  BE00     	bkpt
>
The increments of the magic gauge are small so a value as huge as 0x48 is not shocking. After the subs
the result is stored into r1 before being written to 0x200234e (current_magic global variable).
Unfortunately when we set r1 to a high value we are greeted with a nasty “not enough magic” dialog.
The reason may be that this value must obey to a few other constraints and cannot be any value. For
now we can just fiddle with the value until we find one that works. For this patch we are going to
use 0x7c as it gives us a full magic gauge. We patch the subs instruction with movs r1, #0x7c:
$ r2 -w -b 16 -qc "wx 7c21 @ 0x080a3b98" <your rom>
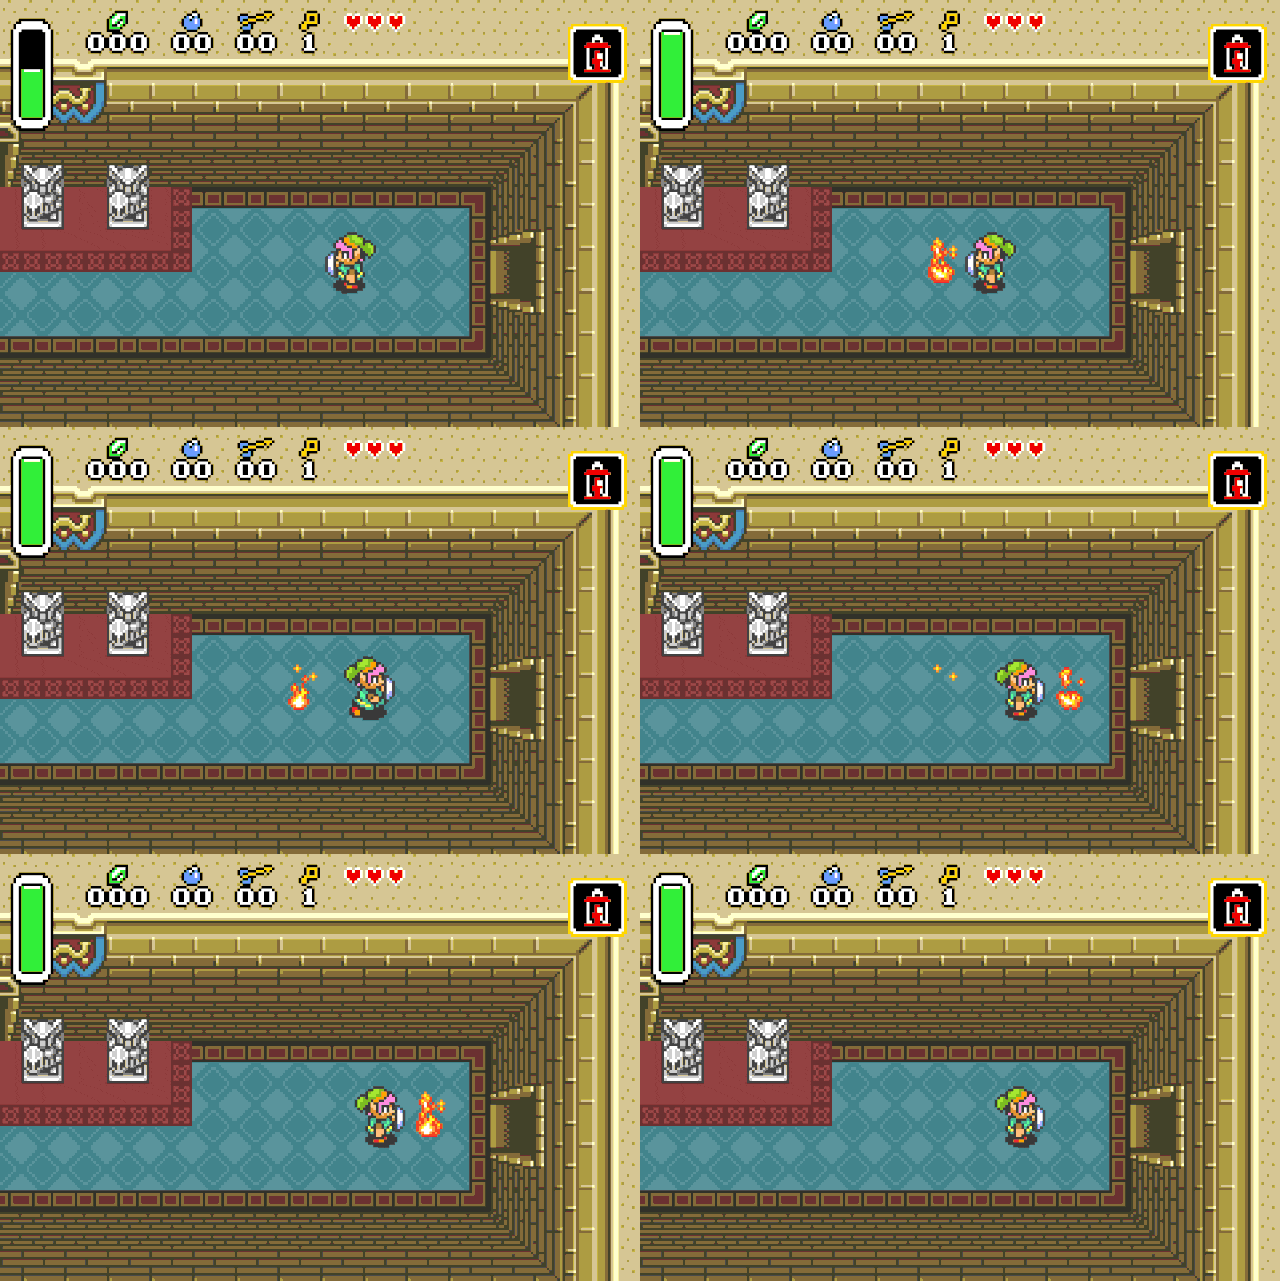
Bonus: Weird values
By trying to understand the NPC damage function I found a few pretty interesting blocks inside.
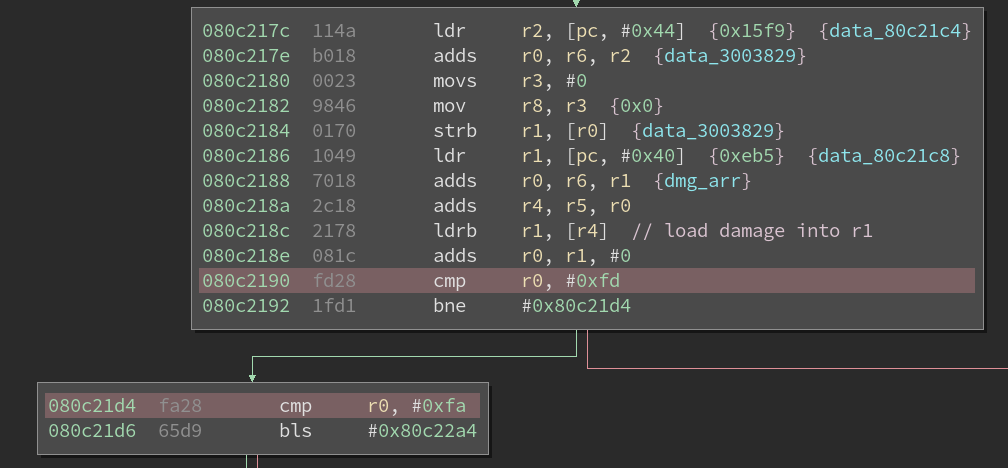
These two blocks are executed before the block used for instakill (the block 0x080c21d4 is its parent).
This code tries to match on interesting values of r1 (the damage), and if they are not found the instakill
block is executed. The comparison shows that these values go through different codepaths than “normal” damage,
what could they be ? From this code we can determine that 0xfd is a special value and that
(0x7b, 0x7c, 0x7e, 0x7f) are different special values. As always, let’s patch the code and see:
For damage = 0xfd:
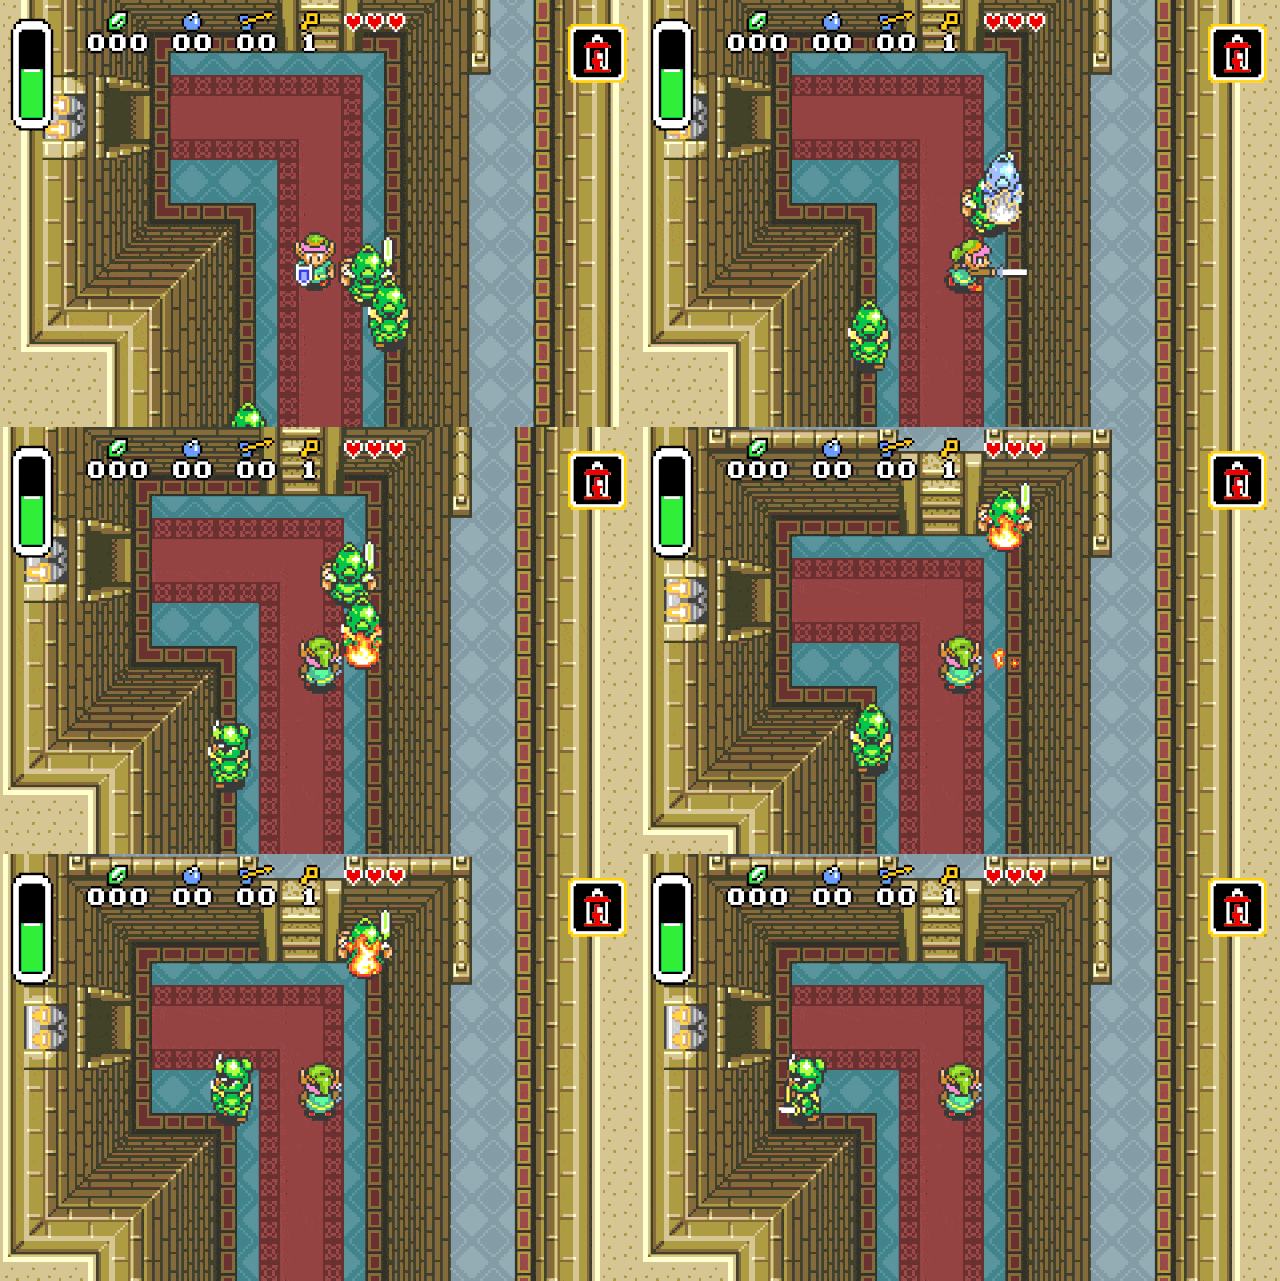
For damage = 0xfb, 0xfc, 0xfe, 0xff:
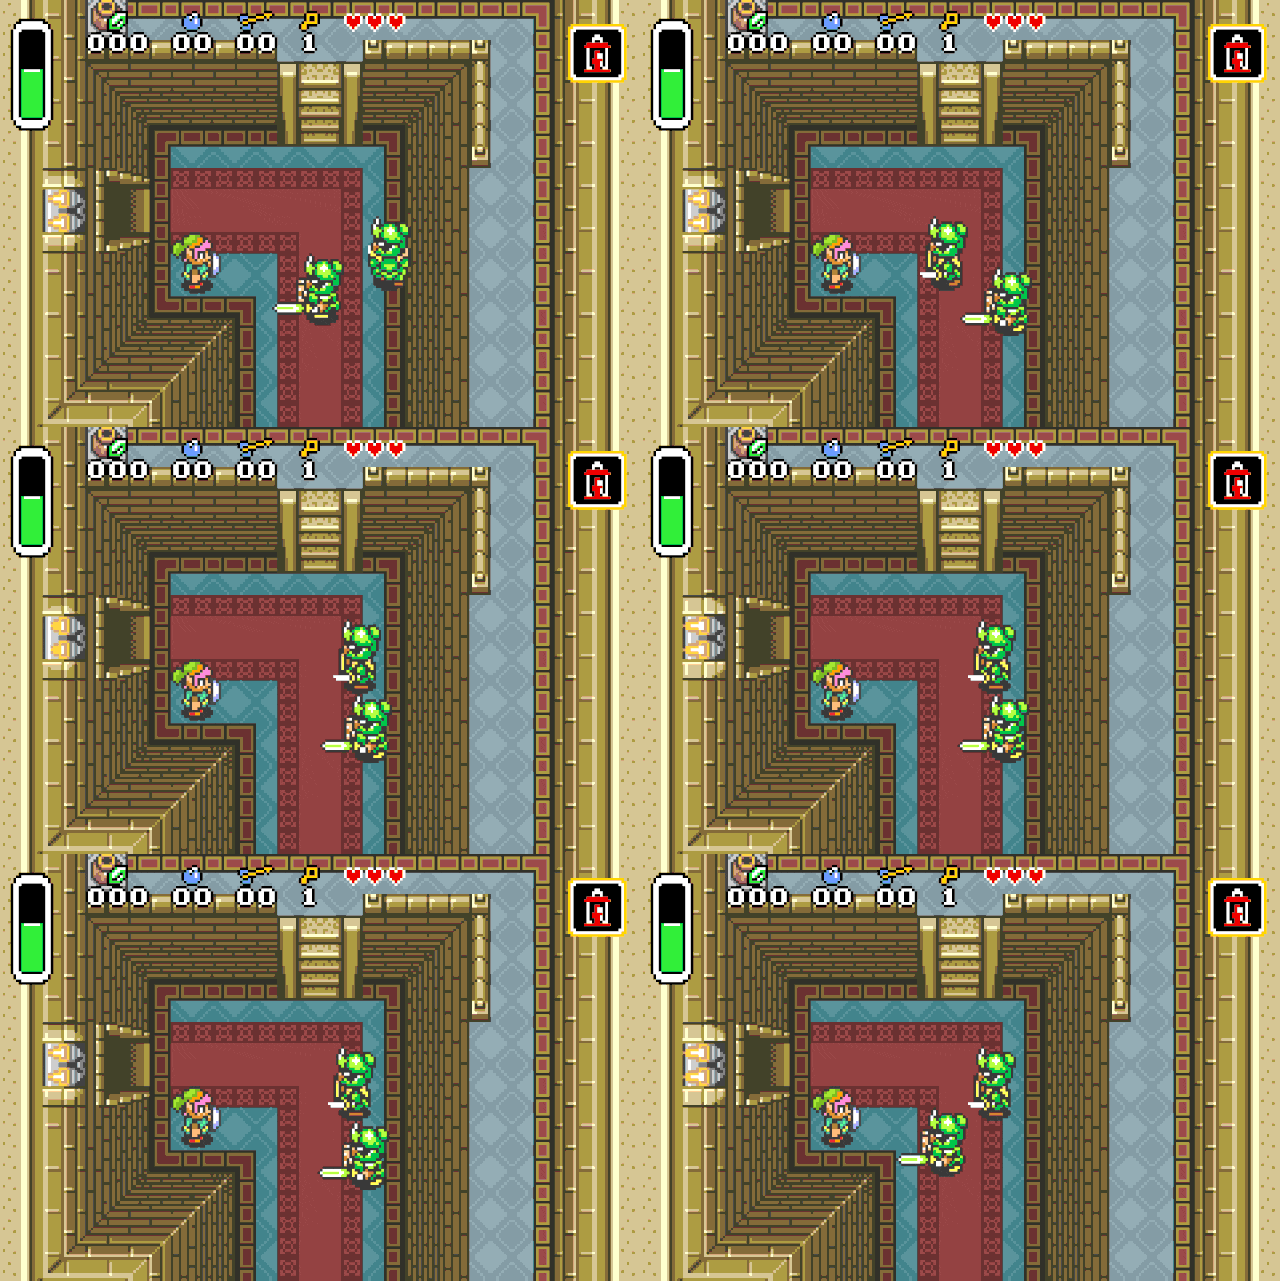
These specific values are used to inflict status effects on entities !
Fire patch r2 -w -b 16 -qc "wx fd20 @ 0x080c218e" <your rom>
Paralysis patch r2 -w -b 16 -qc "wx ff20 @ 0x080c218e" <your rom>
Conclusion
The cheats presented here are more than fun gimmicks, they are the stepping stones to future research.
During their discovery we indirectly discovered interesting facts from the game such as the purpose of
some global variables, functions, and even game mechanics (health system and special damage values).
By exploring the related functions we should be able to make sense of the related code. By repeating
this process we can progressively recover the purpose of more and more code.
Useful Links